 MQTT Addresses I/O – Integration with Node-RED and Home Assistant
MQTT Addresses I/O – Integration with Node-RED and Home Assistant
MQTT Addresses I/O – Integration with Node-RED and Home AssistantThis page describes step by step how third-party systems such as Node-RED and Home Assistant are connected to the uni-PRO controller via the function block MQTT Addresses I/O. The block sends the values of the variables (addresses) as MQTT messages to an MQTT broker and, in the other direction, accepts values that third-party systems send to the broker.
Important: For this function the controller must have an image version 3.034 or higher.
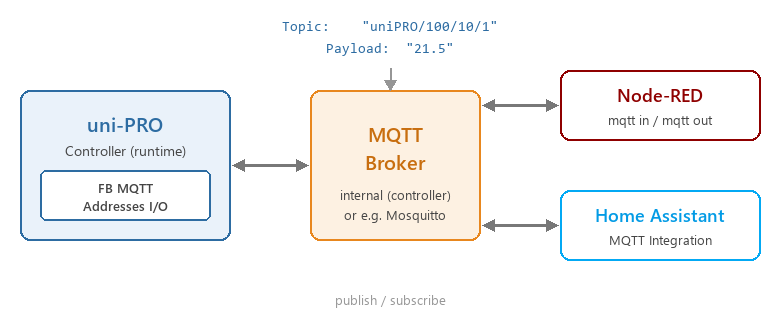
MQTT is a simple messaging protocol for building and device automation. All participants connect to a central server, the broker:
The topic is built from the parameter "Topic prefix" (default "uniPRO") and the address main group/middle group/sub group:
| Topic | uniPRO/100/10/1 (address 100/10/1) |
| Payload sent | Numeric value, e.g. "21.5". Bit variables according to the parameter "Type bit variable" as "0/1", "on/off" or "true/false". Text variables are sent as text. |
| Payload received | "on" and "true" are accepted as 1, "off" and "false" as 0, everything else as a numeric value. For text variables the text is accepted. |
Only addresses of the main groups set in the parameter "Filter main group" are sent and received.
All parameters in detail: help MQTT Addresses I/O. To check the messages, the MQTT diagnosis in the Studio can be used (menu Diagnosis).
Node-RED is a graphical tool for building sequences (flows) from building blocks (nodes) using drag & drop. It runs e.g. on a Raspberry Pi, a server or in Docker. The installation is described here: nodered.org/docs/getting-started. After installation the editor is opened in the browser at "http://<IP-address>:1880".
The MQTT nodes are a core part of Node-RED and do not need to be installed separately. They can be found in the palette on the left in the "network" category:
If additional nodes are required (e.g. dashboards), they can be installed via menu (☰) → "Manage palette".
Drag an "mqtt in" node into the flow and open it by double-clicking. Next to "Server", create a new mqtt-broker configuration using the pencil icon:
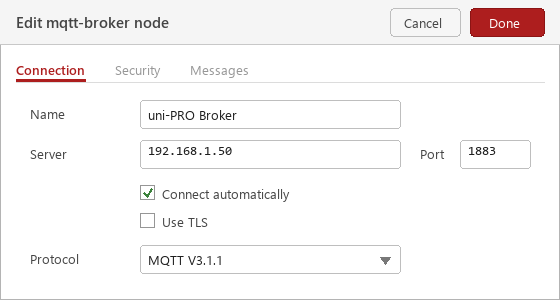
The configuration only needs to be created once and can then be selected in all MQTT nodes.
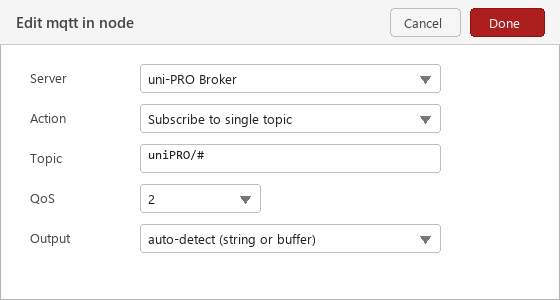
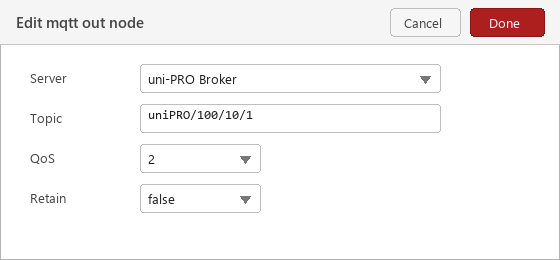
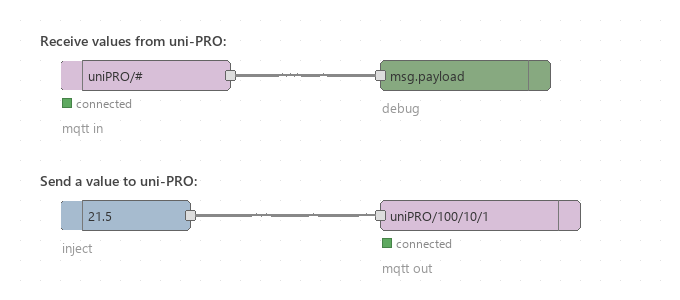
Further examples: Node-RED cookbook MQTT, documentation: nodered.org/docs.
Home Assistant is an open source software for home automation. The MQTT integration of Home Assistant is used for the connection.
Home Assistant and the uni-PRO block must use the same broker. Two options:
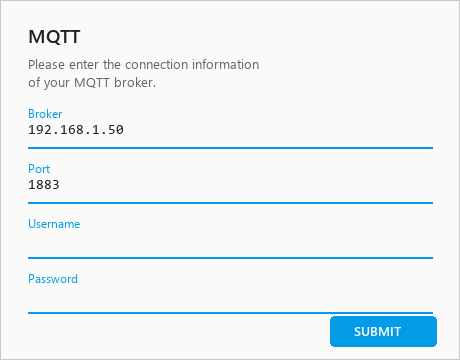
In Home Assistant: Settings → Devices & services → Add integration, search for "MQTT" and enter the connection data of the broker:
If the parameter "Home Assistant Auto Discovery" is activated in the block, the block sends a configuration message to Home Assistant for each variable. The variables then appear automatically as entities of type "number"; the name of the entity is the comment of the address:

Important: With auto discovery activated, the parameter "Topic prefix" must remain at the default value "uniPRO", because the automatically generated configuration uses these topics. Currently only entities of type "number" are created; all values are then transferred as numbers.
Alternatively (or additionally, e.g. for switches), entities can be created manually in the file configuration.yaml. Example for a sensor and a switch:
mqtt:
  sensor:
    - name: "Living room temperature"
      state_topic: "uniPRO/100/10/1"
      unit_of_measurement: "°C"
  switch:
    - name: "Light living room"
      state_topic: "uniPRO/101/1/1"
      command_topic: "uniPRO/101/1/1"
      payload_on: "1"
      payload_off: "0"
payload_on/payload_off must match the parameter "Type bit variable" of the block (e.g. "on"/"off" instead of "1"/"0"). After changes to configuration.yaml, Home Assistant must be restarted. Details: Home Assistant MQTT documentation.
Under Settings → Devices & services → MQTT → Configure, Home Assistant offers a test tool: With "Listen to a topic" and the topic "uniPRO/#" all messages of the block are displayed. Via "Publish a packet" a value can be sent to an address for testing (topic e.g. "uniPRO/100/10/1", payload "21.5").
Note: Node-RED, Home Assistant and Mosquitto are third-party products. The user is responsible for the installation, operation and security of this software; the linked documentation may change.