 Block Time switch
This control element sets the switching times of a time switch –
for instance for the garden lighting, a pump or the setpoint of a room.
Every switching time outputs a value at its point in time; that way several
levels can be spread over the day, for example 100 % in the morning,
50 % during the day and 10 % at night.
Operation
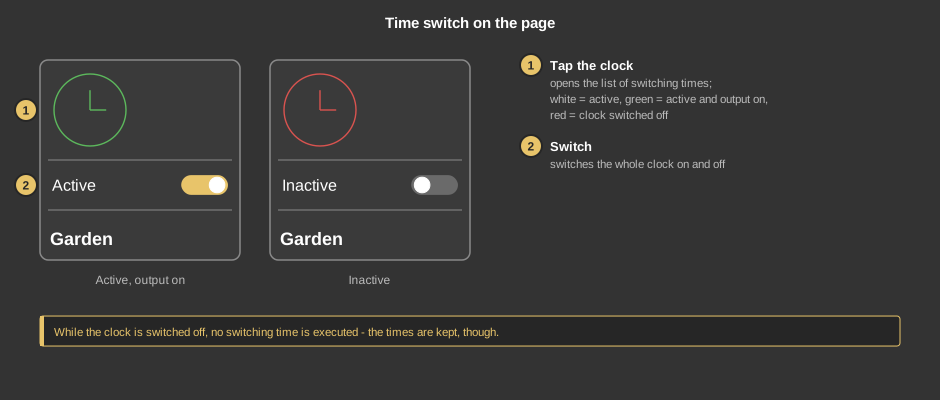
- Clock: a tap opens the list of switching times. The colour shows
the state: white – the clock is active, green –
active and the output is switched on right now, red – the
clock is switched off.
- Switch: switches the whole clock on and off. While it is off, no
switching time is executed; the times are kept.
As a circle (basic screen) a tap opens the list as well.
The switching times
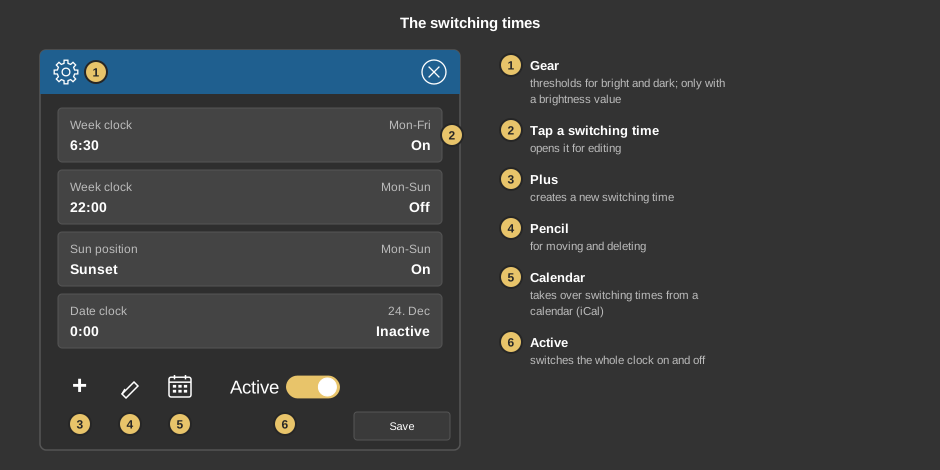
- Gear: the thresholds Threshold bright and Threshold
dark for switching times with a brightness condition, see below. Only
present when a brightness value is available.
- Switching time: each row shows kind, point in time, days and
value. A tap opens it for editing. If the list is longer than the screen,
it is moved by dragging.
- Plus: creates a new switching time.
- Pencil: shows arrows for moving and a symbol for deleting at
every row.
- Calendar: takes over switching times from a calendar, see
Import from calendar.
- Active: switches the whole clock on and off, like the switch on
the tile.
Only Save transfers the changed list to the controller. A clock
holds up to 128 switching times.
Editing a switching time
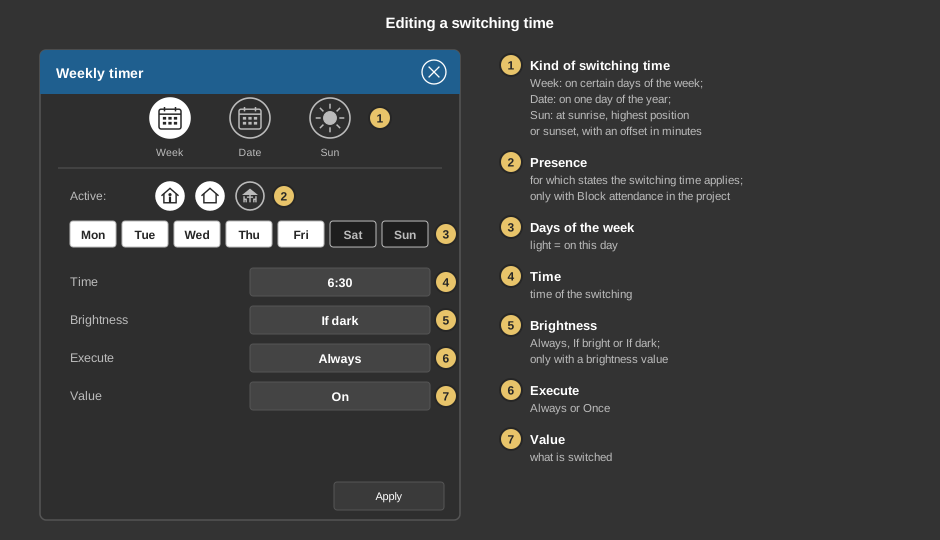
- Kind of switching time: the three symbols at the top select
- Week – on certain days of the week at a time,
- Date – on one day of the year, for instance on 24
December. Under Mode it is chosen whether a value is switched
at that time (Switch) or the whole clock is switched on or off
(Clock active/inactive) – that way the clock rests during
the holidays, for example,
- Sun – at sunrise, highest position or sunset, with an
offset in minutes (Offset). This requires longitude and
latitude of the project to be set.
- Presence: for which states the switching time applies –
only when present, for instance. If none of the three symbols is chosen,
it is not executed. Only appears when the project has a
Block attendance.
- Days of the week: the days on which switching takes place have a
light background (with week and sun).
- Time: the time of the switching.
- Brightness: Always, If bright or If dark,
see below. Only present when a brightness value is available.
- Execute: Always or Once – a one-off
switching time is deleted automatically after switching.
- Value: what is switched at that time – depending on the
setup on/off, a number or a named step.
Apply puts the switching time into the list.
Switching times with a brightness condition
With If bright and If dark the time set is the earliest
possible point in time. If the condition is already fulfilled then –
it is already dark at 7 pm, for instance –, switching takes place
immediately. Otherwise the switching time is noted and executed as soon as
it gets bright or dark. The note expires after six hours and is discarded as
soon as another switching time of this clock is executed – the more
recent one takes precedence. The brightness is checked every ten seconds. A
one-off switching time is only deleted after it has actually
switched.
Import from calendar (iCal)
The calendar symbol takes over switching times from a calendar file
(iCal, *.ics). Each event results in two switching times: 1 (on) is switched
at the start, 0 (off) at the end. Weekly recurring events become week
switching times, single events and yearly series become date switching
times. A preview first shows all events found; Apply imports
them.
- Link: paste the address of a calendar file or a sharing link
– loading starts by itself. Supported are Google Calendar
(“Public” or “Secret address in iCal format” from
the calendar settings, also embed sharing links), publicly shared Apple
iCloud calendars (webcal:// link) and sharing links of Google Drive and
Dropbox. Sharing links are converted to download addresses automatically.
Where to find these links in the services is described in the help of the
Holiday time
clock.
- File: select a local ics file, for instance an export from
Outlook or Google Calendar.
- Clipboard: a copied link is loaded, copied calendar content is
taken over directly.
Notes:
- If the calendar contains several years, a holiday calendar for
instance, the desired year is selected; the current one is
preselected.
- Source and settings are remembered. The next time the calendar is
reloaded at once and can be updated with Apply – preferably
with Replace existing, so that no duplicate switching times
arise.
- Single events repeat every year, unless Once is selected under
Execute single events.
- Monthly repetitions, repetitions with an interval (every two weeks, for
instance), exceptions from series and series ends are not supported;
such events are skipped or taken over without limit and reported in the
dialog. Times with a time zone are taken over as local time.
Setup
This section is meant for the installer of the system.
The control element is linked to the
function block Block Time
switch: first create the function block and its variables, then right
click on the control element and select the function block. The variables
of the function block are taken over. Without a link a tap on the element
points this out.
The clock has no fixed on/off state: every switching time outputs its own
value. That way setpoints or operating modes can be switched as well
– how the values are shown depends on Input value.
Parameters
| View |
Block or Basic Screen. The third choice
List (deprecated) comes from older projects and should no
longer be used. |
| Text |
Caption of the tile. Its size scales with the element,
a line break is inserted with \n, two lines at most. |
| Type |
- Value: the value is entered directly; how it is shown
depends on the data type of the linked variable (on/off for a
bit).
- Step: the value is chosen from the steps, see
below.
|
| Step |
Only with type step. Each step consists of a value and
a caption, for example 1 = Comfort, 2 = Standby, 3 = Night for a room
controller. The variable must then not be a bit. This also allows a bit
to be inverted (0 = on, 1 = off) or automatic/always on/always off to
be shown instead of 0/1/2 for a manual/automatic block. The list is
edited with the button next to the field. |
| Unit |
Is appended to the value in the dialog. |
| Minimum / Maximum |
Limits for entering the value, for a setpoint for
instance. If both are 0, nothing is limited. |
| Longitude / Latitude |
Geographic position for the sun times, only needed for
switching times of the kind sun. It is chosen with the button
“…” next to the field. |
Variable links
The variables come from the
function block:
| Enable |
Optional. Active state of the clock; the switch
Active writes 1 or 0. Not linked: instead of the switch only the
text active/inactive is shown, the clock cannot be switched off. |
| Brightness |
Optional. Current brightness value in lux. Not
linked: no brightness condition, no gear; every switching time is
always executed. |
| Status |
Optional. Output of the clock; not equal to 0
turns the clock symbol green. Not linked: the symbol is always white
while the clock is active. |
See also General properties of all
control elements.