 User administration
User administration
User administrationMenu Project – User administration.
With the user administration one or more users are assigned to a page of the visualization. Through the control element Block user control you log in on the APP and afterwards only see those pages that are released for this user.
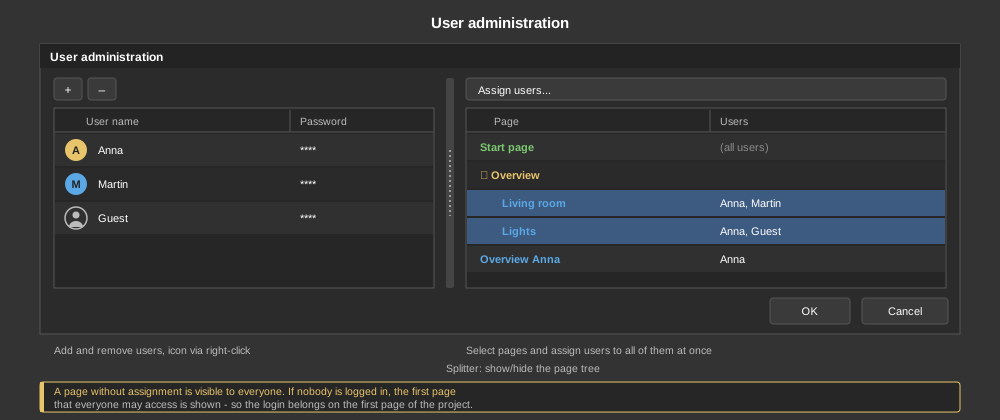
In the dialog users are created with + and removed again with −. For each entry a user name and a password are given. The user name is stored in the project, the password on the other hand in the persistent values of the controller – because it can also be changed at the control element and must not be overwritten again on the next transfer.
Optionally, an icon can be assigned to each user: right-click the user – Select icon.... The selection of the project graphics opens, the same one the control element Dynamic graphic uses. With Remove icon the user returns to the default icon. The icon is shown in front of the name in the list and by the Block user control for the logged-on user. If none is selected, the default icon is shown. A graphic that is only used as a user icon counts as in use in the image selection.
In the page tree you define which users may see a page. This is the same setting as in the properties of the page – but the dialog lets you edit many pages at once.
If a user is renamed or deleted, the change is carried over to the page assignments. Note: if a page has no user left afterwards, it is visible to everyone again. The tree only contains visualization pages, no program pages.
The users that may access a page are selected in the dialog (see above) or in the properties of the page. The following applies:
The first page in the project should therefore always be the one open to everyone – and that is where the control element for logging in belongs.
Tip: If the APP is to start with a certain user right away without logging in, there is the start parameter --logon-user, see APP – Start parameters.